Understanding how your disk space is used is crucial for performance and organization. This guide will teach you all the essential ways to check directory sizes in Linux, whether you prefer the command line or a graphical interface. We’ll cover everything from simple commands to advanced techniques, making this your go-to resource for disk usage analysis.
Table of Contents
Command-Line Tools
Linux offers a variety of command-line tools for analyzing directory sizes. These are powerful, flexible, and ideal for scripting and automation.
Using the du Command
The du (disk usage) command is one of the most commonly used tools for checking directory sizes in Linux. It summarizes disk usage of each file and directory recursively.
The basic syntax for the du command is:
du [options] [directory]For example, to check the size of a directory named example_directory, you would use:
du example_directoryThis command outputs the size of each subdirectory within example_directory and the total size at the end.
Common Options
The du command comes with several options that enhance its functionality:
-h(Human-readable): Displays sizes in a human-readable format (e.g., KB, MB, GB).
du -h example_directoryExample output:
  4.0K    example_directory/subdir1
  8.0K    example_directory/subdir2
12K example_directory-s(Summarize): Shows only the total size of the specified directory.
du -sh example_directoryExample output:
12K example_directory-a(All files): Includes all files, not just directories.
du -ah example_directoryExample output:
  2.0K    example_directory/file1
  4.0K    example_directory/subdir1/file2
  8.0K    example_directory/subdir2
  12K     example_directory
These options can be combined to provide detailed and readable disk usage information.
Combining du with sort
Sorting the output of du can help you quickly identify the largest directories, making it easier to target areas for cleanup.
To sort directories by size in descending order, you can use:
du -h /path/to/directory | sort -hrHere’s how this works:
du -h /path/to/directoryprovides the disk usage in a human-readable format.|pipes the output to the next command.sort -hrsorts the output numerically by human-readable numbers in reverse order, so the largest items appear first.
Example:
du -h /var | sort -hrOutput:
1.5G    /var
500M    /var/log
200M    /var/www
100M    /var/cache
Combining du with grep
Using grep with du helps filter results, especially useful when searching for specific directories or files within a larger structure.
To find directories containing “log” in their names and sort them by size:
du -h /path/to/directory | grep 'log' | sort -hrExample:
du -h /var | grep 'log' | sort -hrOutput:
500M /var/logUsing ncdu Command
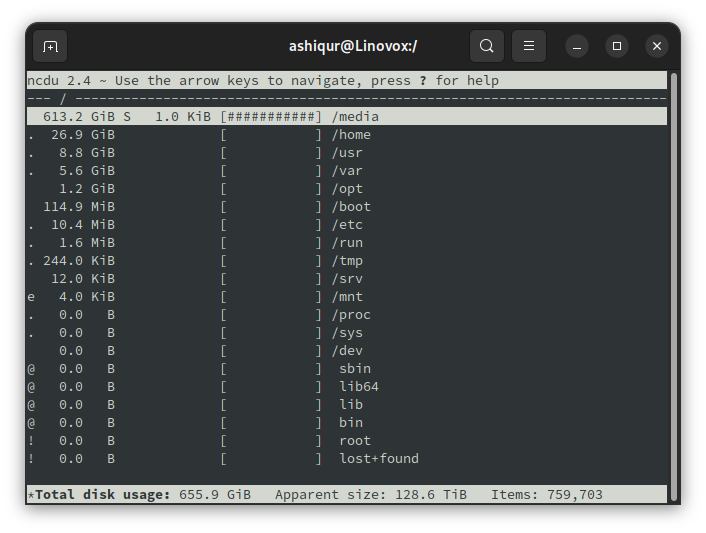
ncdu (NCurses Disk Usage) is a disk usage analyzer with an ncurses interface, providing an interactive way to explore disk usage. It is particularly useful for a more visual and navigable representation of disk usage.
Installation
To install ncdu on various Linux distributions, use the following commands:
sudo apt-get install ncduBasic Usage
To start ncdu, simply run:
ncdu /path/to/directoryExample:
ncdu /home/userThis command opens an interactive ncurses-based interface where you can navigate through directories and see their sizes in a clear, tree-like format.
User Interface
- Navigation: Use the arrow keys to move up and down the list.
- Entering Directories: Press the Enter key to drill down into a directory.
- Going Up a Level: Press the Left arrow key to go back to the parent directory.
- Deleting Files/Directories: Press
dto delete the selected file or directory (use with caution).
Example output:
GUI Tools for Checking Directory Size
For users who prefer graphical interfaces over command-line tools, several GUI tools are available to help you check and manage directory sizes in Linux. These tools offer intuitive, visual representations of disk usage, making it easier to identify large directories and files. This section explores some of the most popular GUI tools for this purpose.
Using File Managers
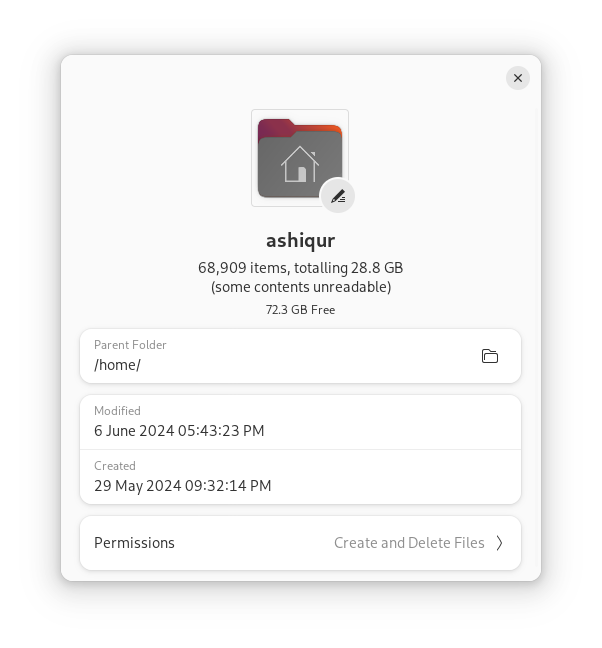
Most Linux desktop environments come with built-in file managers that include features for checking directory sizes. Popular file managers include Nautilus (GNOME), Dolphin (KDE), and Thunar (Xfce). These file managers provide a user-friendly way to navigate through your filesystem and view the sizes of directories and files.
Checking Directory Sizes:
- Navigate to the directory you want to check.
- Right-click on the directory and select “Properties.”
- The “Properties” window will display the total size of the directory and its contents.
Baobab (Disk Usage Analyzer)
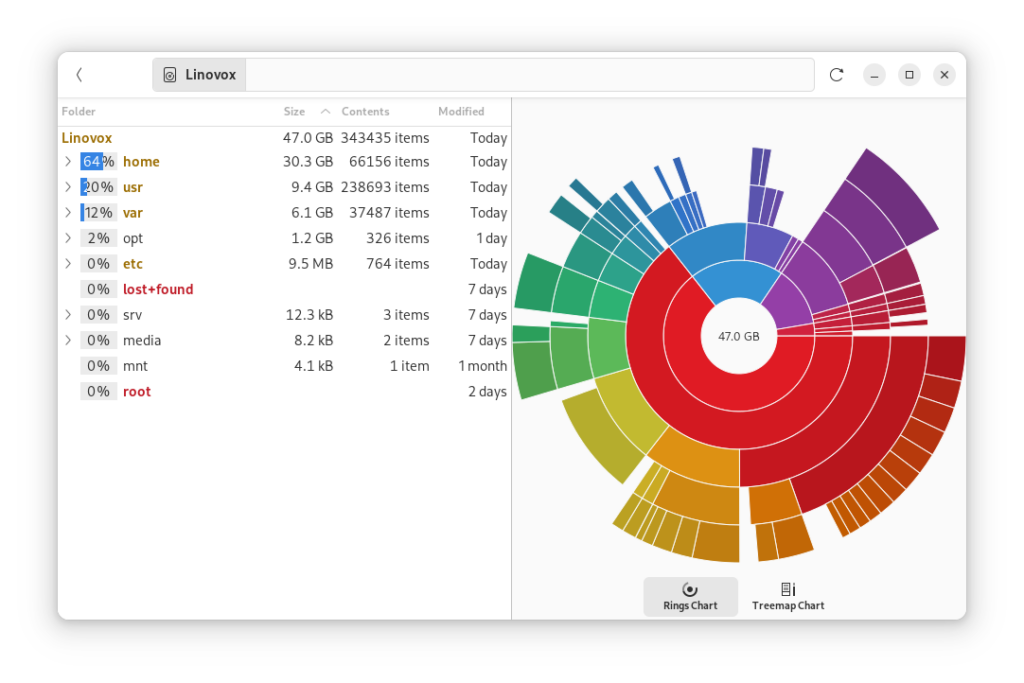
Baobab, also known as Disk Usage Analyzer, is a graphical tool designed to provide a detailed visualization of disk usage. It is part of the GNOME desktop environment and is known for its user-friendly interface and powerful features. Baobab helps users quickly identify large directories and files, making disk space management more efficient.
Installation
Baobab is often pre-installed on GNOME-based systems. However, if it is not available on your system, you can easily install it using the package manager of your Linux distribution. To install Baobab on Debian-based systems such as Ubuntu, use the following command:
sudo apt-get install baobabBasic Usage
Once installed, Baobab can be launched from the application menu by searching for “Disk Usage Analyzer” or “Baobab.” Upon launching, Baobab provides options to scan your home directory, entire filesystem, or a specific directory. To scan a specific directory, click on the “Scan Folder” button and select the desired directory.
User Interface
- Ring Chart: Provides a visual representation of disk usage with rings representing different directory levels. The size of each segment corresponds to the size of the directory or file.
- Tree View: Offers a detailed hierarchical view of disk usage, making it easy to drill down into specific directories.
QDirStat
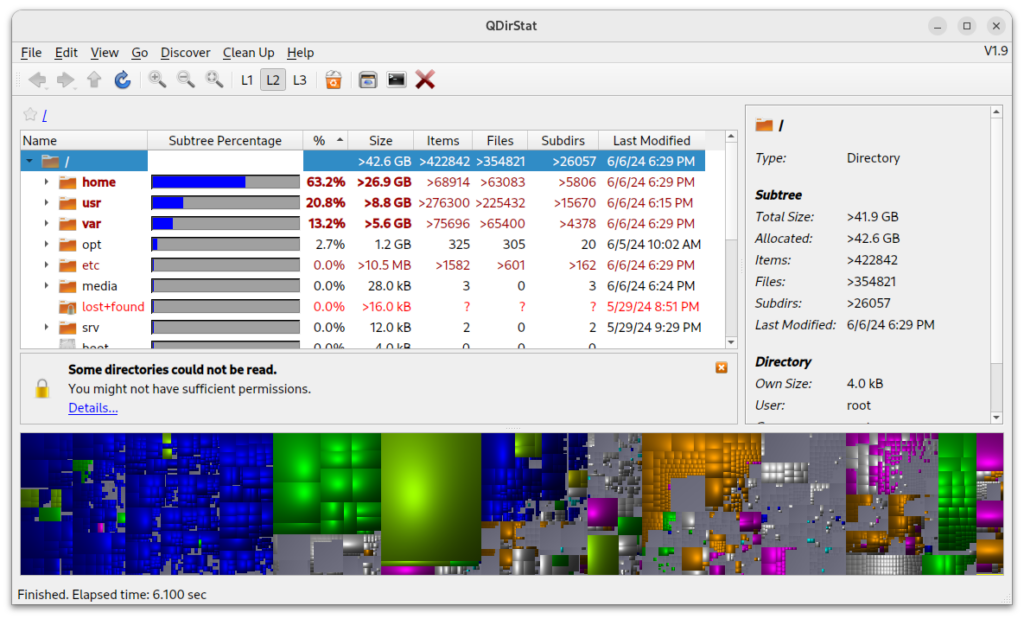
QDirStat is a powerful graphical disk usage analyzer that provides detailed insights into how your disk space is being used. It is a continuation of the KDirStat project, combining a user-friendly interface with advanced features for in-depth disk usage analysis. QDirStat is versatile and can be used across various desktop environments, making it a valuable tool for any Linux user.
Installation
QDirStat can be installed on most Linux distributions using the respective package managers. To install QDirStat on Debian-based systems such as Ubuntu, use the following command:
sudo apt-get install qdirstatBasic Usage
Once installed, QDirStat can be launched from the application menu. Upon launching, QDirStat prompts you to select a directory or filesystem to scan. Choose the desired directory or the entire filesystem for analysis.
User Interface
QDirStat displays a tree-map of disk usage, where each rectangle represents a file or directory. The size of each rectangle corresponds to the size of the file or directory, providing a clear visual representation of disk usage.
Features and Options
QDirStat offers several features and options to enhance its functionality:
- Filter Options: QDirStat allows you to filter files and directories based on size, type, and other criteria, helping you focus on the most relevant data.
- Built-in Cleanup: QDirStat includes built-in actions for cleaning up your filesystem. You can delete, move, or open files and directories directly from the interface.
Conclusion
Checking directory sizes in Linux is easy once you know the right tools. Whether you’re a command-line enthusiast or prefer graphical tools, there’s a method that suits your workflow. Start exploring these techniques today to keep your disk space under control and your system running smoothly.
