Creating a bootable USB drive is essential for installing a new operating system on your computer. If you’re using Ubuntu and want a reliable tool that works seamlessly on both Linux and Windows, Ventoy is the best choice.
This guide will walk you through the process of creating a Windows 11 bootable USB drive using Ventoy on Ubuntu
Prerequisites
Before you start, ensure you have the following:
- A USB drive with at least 8 GB of storage.
- An Ubuntu operating system with administrative privileges.
Important: Creating a bootable USB will erase all data on the drive. Make sure to back up any important files before proceeding.
Download Windows 11 ISO
First, download the Windows 11 ISO image from the official Microsoft website. This file is necessary for creating your bootable USB.
Install Ventoy
To create a bootable USB, you need to download and install Ventoy on Ubuntu. Follow these steps to install Ventoy properly on Ubuntu:
Open your terminal by pressing ALT + CTRL + T and enter the following command to download the latest version of Ventoy from GitHub.
wget -O ~/ventoy.tar.gz https://github.com/ventoy/Ventoy/releases/download/v1.0.97/ventoy-1.0.97-linux.tar.gzExtract the downloaded archive
tar -zxvf ~/ventoy.tar.gzCreate Bootable USB
Now that you have downloaded the Ventoy. It’s time to create a bootable USB. Open your Ubuntu terminal and navigate to the Ventoy script’s directory to make a bootable USB. You can do so by entering the command in your terminal.
cd ventoy-1.0.97In the Ventoy directory, the CLI and GUI version of Ventoy are available. We will use GUI only to make this tutorial easy. Open Ventoy GUI with the following command
sudo ./VentoyGUI.x86_64Select Your USB Drive
Select the USB drive you want to make bootable if you have multiple USB inserts in your Ubuntu Machine.
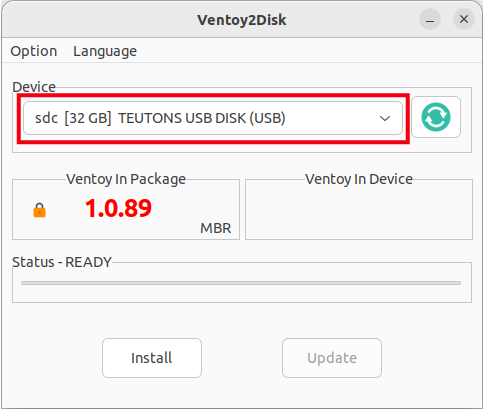
Warning: This process will erase all data on the selected USB drive. Ensure you have backed up your data.
Choose Partition Style
Next, choose the appropriate partition style for your USB drive. Click on Option in the bottom-left corner of the Ventoy GUI and select the partition style. You can choose between MBR (Master Boot Record) and GPT (GUID Partition Table):
- GPT: Recommended for UEFI boot mode, offering better security and faster boot times.
- MBR: Use this if you need legacy BIOS compatibility.
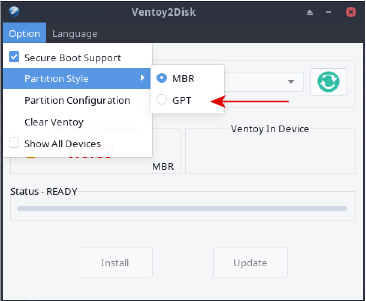
Install Ventoy
After selecting the partition style, click Install to make your USB drive bootable. Confirm the warning message that appears, as this action will erase all data on the USB drive.
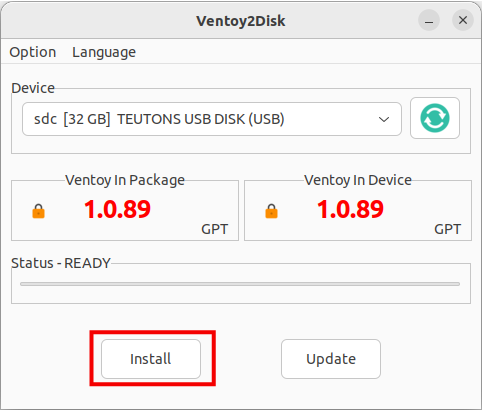
Select ok to continue.

Copy ISO Files to Ventoy Drive
Once Ventoy is installed on the USB drive, copy the Windows 11 ISO file you downloaded earlier to the Ventoy drive.
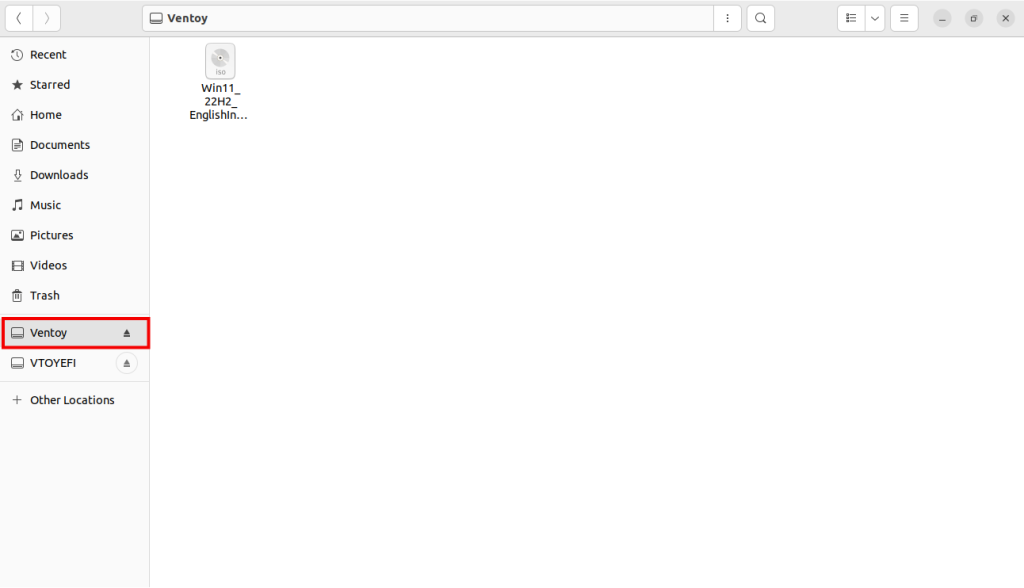
Conclusion
Congratulations! You’ve successfully created a Windows 11 bootable USB using Ventoy on Ubuntu. Ventoy’s versatility allows you to add multiple ISO files to your USB drive, making it a powerful tool for various installation needs.


I have followed your instructions to the letter, but it didn’t work. Upon booting the USB I have a message from the Ventroy stating that there is no .ISO image found or something of sorts.
After installing Ventoy, simply copy your ISO files to the Ventoy folder. If you have multiple ISO files, they will appear as a list on the booting screen.
Hi, thanks a lot for this solution, it worked for me about two months ago, I was searching a lot until I found this page.
The thing is now I’m revisiting this tutorial because I’m trying to use my usb to store data and first I was unabled to read the data from the USB, then I try to format it and its can not be done cause it has read only property. Try also with balenaEtcher and couldn’t either.
Finaly I could format it with diskpart on PS and now inestead of appearing two usb (like it should if the tutorial is done) when I plug my usb it shows for units drive. Now I’m able to use the corresponding usb from the other 3 to store data, but I will try to follow again the tutorial so I can find a way to fix this undesire behabior.
Thanks a lot for this tutorial, it was so helpful