Neovim is a powerful text editor that can be customized to suit the needs of any developer. One of its most important features is the nvim-cmp auto completion plugin, which allows you to quickly and easily complete code, snippets, and symbols as you type.
In this blog post, I will discuss the basics of nvim-cmp, including how to install, configure, and use it.
Table of Contents
Prerequisites
Before proceeding with the installation and usage of nvim-cmp in Neovim, please make sure you have the following packages installed on your system:
Neovim
To use nvim-cmp, you must have Neovim installed. I assume that you have already installed Neovim.
Packer
Packer is a plugin manager for Neovim. You need Packer to install the nvim-cmp plugin. So, make sure Packer is installed in Neovim before proceeding. If you haven’t installed Packer yet, consider installing Packer and follow the rest of the tutorial.
Installing nvim-cmp
Before installing nvim-cmp in Neovim, let’s take a look at the project structure. Please note that you can still follow this guide even if you have a different project structure. Just be careful when editing the configuration files.
~/.config/
└── nvim
    ├── init.lua
    └── lua
        ├── plugins.lua
        ├── nvim-cmp.lua
        ├── .....
        └── other configuration files
To install the nvim-cmp plugin, open the plugins.lua file using the following command:
nvim ~/.config/nvim/lua/plugins.luaIf your plugins file has a different name or is located in a different directory, open the file accordingly. After opening the plugins file, add the following lines to install nvim-cmp and useful cmp extensions:
-- autocompletion
use("hrsh7th/nvim-cmp") -- completion plugin
use("hrsh7th/cmp-buffer") -- source for text in buffer
use("hrsh7th/cmp-path") -- source for file system paths

-- snippets
use("L3MON4D3/LuaSnip") -- snippet engine
use("saadparwaiz1/cmp_luasnip") -- for autocompletion
use("rafamadriz/friendly-snippets") -- useful snippets
Once you’ve added these lines to the plugins.lua file, save it using the :w command to install the plugins. Alternatively, you can use the following command to install the plugins:
:PackerInstallConfiguring nvim-cmp
Once you have installed the necessary plugins for autocompletion and snippets, you need to create a configuration file to start using auto completion. To configure nvim-cmp, create a file named nvim-cmp.lua in your lua directory or your preferred location if you have a different project structure.
nvim ~/.config/nvim/lua/nvim-cmp.luaThen add the following configuration to the file:
-- import nvim-cmp plugin safely
local cmp_status, cmp = pcall(require, "cmp")
if not cmp_status then
  return
end

-- import luasnip plugin safely
local luasnip_status, luasnip = pcall(require, "luasnip")
if not luasnip_status then
  return
end

-- load VSCode-like snippets from plugins (e.g., friendly-snippets)


require("luasnip/loaders/from_vscode").lazy_load()

vim.opt.completeopt = "menu,menuone,noselect"

cmp.setup({
  snippet = {
    expand = function(args)
      luasnip.lsp_expand(args.body)
    end,
  },
  mapping = cmp.mapping.preset.insert({
    ["<C-k>"] = cmp.mapping.select_prev_item(), -- previous suggestion
    ["<C-j>"] = cmp.mapping.select_next_item(), -- next suggestion
    ["<C-b>"] = cmp.mapping.scroll_docs(-4),
    ["<C-f>"] = cmp.mapping.scroll_docs(4),
    ["<C-Space>"] = cmp.mapping.complete(), -- show completion suggestions
    ["<C-e>"] = cmp.mapping.abort(), -- close completion window
    ["<CR>"] = cmp.mapping.confirm({ select = false }),
  }),
  -- sources for autocompletion
  sources = cmp.config.sources({
    { name = "nvim_lsp" }, -- LSP
    { name = "luasnip" }, -- snippets
    { name = "buffer" }, -- text within the current buffer
    { name = "path" }, -- file system paths
  }),
})Credit: dev-environment-files
After adding these configurations to the nvim-cmp.lua file, save the file and exit.
Next, open the init.lua file:
nvim ~/.config/nvim/init.luaAdd the following line to the bottom of the file to enable nvim-cmp auto completion:
require('nvim-cmp')Understanding the Key Bindings in the Configuration
You can use various commands to interact with nvim-cmp. For example, you can use the <C-Space> key to trigger completion, and the <C-e> key to close the completion menu.
Here is a table of the most common commands that you can use with nvim-cmp:
| Command | Description |
|---|---|
| Ctrl + j | Select the next completion suggestion |
| Ctrl + k | Select the previous completion suggestion |
| Ctrl + b | Scroll up to the preview |
| Ctrl + f | Scroll down to the preview |
| Ctrl + Space | Show completion suggestions |
| Enter | Confirm completion |
| Ctrl + e | Close the completion menu |
How to Use nvim-cmp
You can use nvim-cmp to autocomplete basic commands and insert snippets for advanced autocompletion with LSP. For this blog post, we will focus on basic autocompletion within the buffer and path completion within the current directory.
Autocompletion Within the Current Buffer
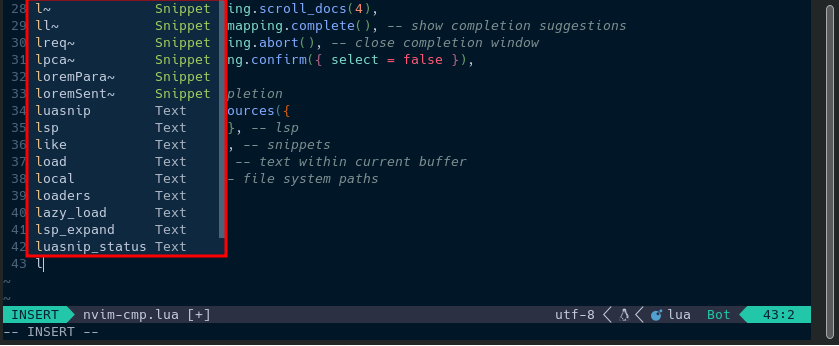
To use nvim-cmp, open a file with Neovim and start typing your code. You will see the completion suggestions next to your writing.

From the suggestion menu, you can navigate using Ctrl + j and Ctrl + k, and select any command completion or snippets with Enter. You can learn more about preconfigured snippets at the Friendly Snippets wiki.
Path Autocompletion
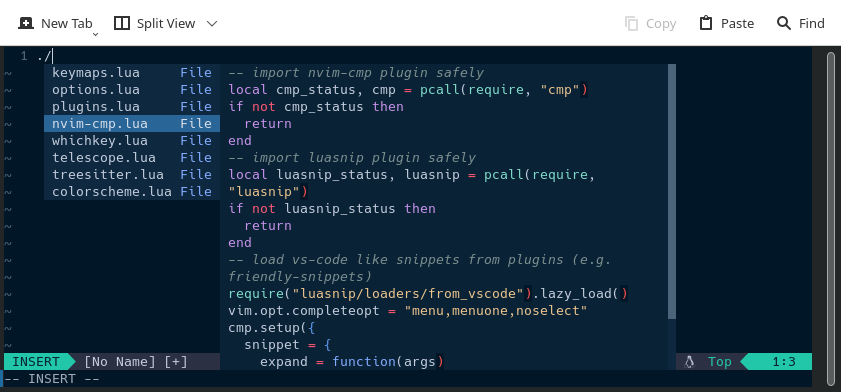
You can also use nvim-cmp to autocomplete file paths within the current directory. You will also see a preview of what those files look like. To use path autocompletion, start typing ./, and then you will see a list of files in the current directory.

You can navigate through the menu using Ctrl + j and Ctrl + k, and use Ctrl + b and Ctrl + f to scroll through the file preview. Use Enter to insert the path autocompletion. It’s important to note that nvim-cmp only autocompletes relative paths.
Conclusion
In this blog post, I have discussed nvim-cmp, a powerful and customizable autocompletion plugin for Neovim. I have covered how to install, configure, and use nvim-cmp.
I hope this blog post has been helpful. If you have any questions, please feel free to leave a comment below.


