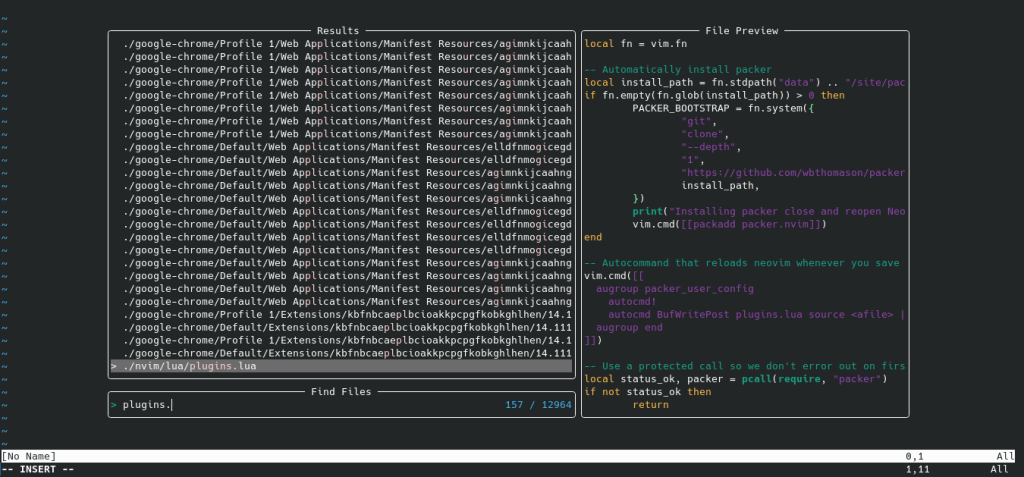
Telescope is a highly versatile fuzzy finder over lists. It is a feature-rich Neovim plugin that takes searching in Neovim to another level. With Telescope, you can easily search through files, buffers, project directories, and even through the Language Server Protocol (LSP). Additionally, Telescope is highly customizable, allowing you to tweak its configuration to better suit your needs.
In this blog post, I will demonstrate how to install and use the Telescope plugin with Neovim and Packer. I will also guide you through the process of customizing the Telescope plugin.
Table of Contents
Prerequisites
Before proceeding with the installation and usage of Telescope in Neovim, ensure that you have the following packages installed on your system:
Neovim (>=0.9.0)
To use Telescope, your system should have Neovim version 0.9.0 or higher. You can check your currently installed version of Neovim by running the following command:
nvim --versionIf you have a version below 0.9.0, consider upgrading your system using the following command:
sudo apt update && sudo apt upgradeIf the repository of your distribution doesn’t contain the latest version of Neovim (e.g., Debian 12), you can use the snap package to install the latest version:
sudo snap install nvim --classicPacker
Packer is a plugin manager for Neovim, and since Telescope is a Neovim plugin, you need to have Packer installed. If you haven’t installed Packer in Neovim yet, you can follow this tutorial on how to install Packer in Neovim.
Installing Telescope
Installing Telescope is a straightforward process once you have Packer installed. To begin, open the plugins.lua file in your Neovim configuration. If you have followed our guide on installing Packer, your file structure should resemble the following:
~/.config/
└── nvim
    ├── init.lua
    └── lua/
        └── plugins.lua
To open the plugins.lua file, use the following command:
nvim ~/.config/nvim/lua/plugins.luaIf your plugins.lua file is located in a different directory, open it using the appropriate command. Once the file is open, locate the section that says -- Install your plugins here and add the following lines below it:
	use("nvim-lua/plenary.nvim") -- Lua functions that Telescope plugin use
	use("nvim-telescope/telescope.nvim")

The final configuration of the plugins.lua file should look like this:
local fn = vim.fn

-- Automatically install packer
local install_path = fn.stdpath("data") .. "/site/pack/packer/start/packer.nvim"
if fn.empty(fn.glob(install_path)) > 0 then
	PACKER_BOOTSTRAP = fn.system({
		"git",
		"clone",
		"--depth",
		"1",
		"<https://github.com/wbthomason/packer.nvim>",
		install_path,
	})
	print("Installing packer, close and reopen Neovim...")
	vim.cmd([[packadd packer.nvim]])
end

-- Autocommand that reloads Neovim whenever you save the plugins.lua file
vim.cmd([[
  augroup packer_user_config
    autocmd!
    autocmd BufWritePost plugins.lua source <afile> | PackerSync
  augroup end
]])

-- Use a protected call to avoid erroring out on first use
local status_ok, packer = pcall(require, "packer")
if not status_ok then
	return
end

-- Have packer use a popup window
packer.init({
	display = {
		open_fn = function()
			return require("packer.util").float({ border = "rounded" })
		end,
	},
})

-- Install your plugins here
return packer.startup(function(use)
	use("wbthomason/packer.nvim") -- Have packer manage itself
	use("nvim-lua/plenary.nvim") -- Lua functions that Telescope plugins use
	use("nvim-telescope/telescope.nvim")

	if PACKER_BOOTSTRAP then
		require("packer").sync()
	end
end)
After making these changes, save the file by entering :w and proceed to install the Telescope plugin.
Using Telescope
Telescope offers a powerful and flexible searching feature in Neovim. With Telescope, you can easily find files within the parent directory and open them directly. This is particularly useful when working on complex projects and you need to quickly navigate through files.
Finding Files
To search for files in your project, use the find_files picker. Open Telescope and enter the following command:
:Telescope find_filesTelescope will open a file picker where you can enter your search query and browse through the matching files.

Searching in Buffers
If you want to search within your currently open buffers, you can use the buffers picker:
:Telescope buffersThis will display a list of open buffers, allowing you to quickly switch between them or search for specific buffers.
Grep Searching
Telescope’s live_grep picker enables you to perform powerful grep searches across your project. Initiate a grep search with the following command:
:Telescope live_grepEnter your search query, and Telescope will display the search results, allowing you to navigate through the matches.
Git Files
To search for files within your Git repository, use the git_files picker:
:Telescope git_filesThis picker will show you all the files in your Git repository, making it convenient to navigate and search for specific files.
Configuring Telescope
You can customize Telescope to better suit your needs and enhance its functionality with extensions. These extensions allow you to extend the capabilities of Telescope plugins.
Using Which Key
To make file searching easier and execute Telescope commands more efficiently, you can utilize Which Key plugin. By mapping Telescope commands to specific shortcuts, you can swiftly perform searches and enhance your productivity. If you haven’t configured Which Key yet, you can refer to our guide on how to set up Which Key in Neovim.
Open the whichkey.lua file using the following command:
nvim ~/.config/nvim/lua/whichkey.luaOnce the file is open, add the following lines to it:
-- Telescope
["f"] = {
    "<cmd>lua require('telescope.builtin').find_files(require('telescope.themes').get_dropdown{previewer = false})<cr>",
    "Find files",
  },
["F"] = { "<cmd>Telescope live_grep theme=ivy<cr>", "Find Text" },
["P"] = { "<cmd>lua require('telescope').extensions.projects.projects()<cr>", "Projects" },
s = {
    name = "Search",
    b = { "<cmd>Telescope git_branches<cr>", "Checkout branch" },
    c = { "<cmd>Telescope colorscheme<cr>", "Colorscheme" },
    h = { "<cmd>Telescope help_tags<cr>", "Find Help" },
    M = { "<cmd>Telescope man_pages<cr>", "Man Pages" },
    r = { "<cmd>Telescope oldfiles<cr>", "Open Recent File" },
    R = { "<cmd>Telescope registers<cr>", "Registers" },
    k = { "<cmd>Telescope keymaps<cr>", "Keymaps" },
    C = { "<cmd>Telescope commands<cr>", "Commands" },
  },
Save the file by using the :wq command. Now, you can use the ladder key followed by the corresponding key mapping to open Telescope more quickly and efficiently.
Changing Keybindings
You have the flexibility to customize the keybindings used by Telescope according to your workflow. Here’s a suggested key mapping for Telescope:
| Key Mapping | Action |
|---|---|
| Ctrl + n | Cycle to the next history item |
| Ctrl + p | Cycle to the previous history item |
| Ctrl + j | Move selection to the next item |
| Ctrl + k | Move selection to the previous item |
| Ctrl + c | Close the Telescope prompt |
| Down | Move selection to the next item |
| Up | Move selection to the previous item |
| Enter | Select the default option |
| Ctrl + x | Select in a horizontal split |
| Ctrl + v | Select in a vertical split |
| Ctrl + t | Select in a new tab |
| Ctrl + u | Scroll the preview window up |
| Ctrl + d | Scroll the preview window down |
| PageUp | Scroll the results window up |
| PageDown | Scroll the results window down |
| Tab | Toggle selection and move to the next worse match |
| Shift + Tab | Toggle selection and move to the previous better match |
| Ctrl + q | Send selected items to the quickfix list and open the quickfix list |
| Alt + q | Send selected items to the quickfix list and open the quickfix list (selected items only) |
| Ctrl + l | Complete tag |
| Ctrl + – | Open the Telescope keymap menu (keys from pressing Ctrl + /) |
| Esc | Close the Telescope prompt |
| j | Move selection to the next item |
| k | Move selection to the previous item |
| H | Move selection to the top of the list |
| M | Move selection to the middle of the list |
| L | Move selection to the bottom of the list |
| gg | Move selection to the top of the list |
| G | Move selection to the bottom of the list |
| ? | Open the Telescope keymap menu |
To create a custom key mapping, open the terminal and enter the following command:
nvim ~/.config/nvim/lua/telescope.luaThis command will create the Telescope configuration file if it doesn’t already exist, or open the file if it does. Enter the provided configuration into the file.
local status_ok, telescope = pcall(require, "telescope")
if not status_ok then
return
end
local actions = require "telescope.actions"
telescope.setup {
defaults = {
prompt_prefix = " ",
selection_caret = " ",
path_display = { "smart" },
mappings = {
i = {
["<C-n>"] = actions.cycle_history_next,
["<C-p>"] = actions.cycle_history_prev,
["<C-j>"] = actions.move_selection_next,
["<C-k>"] = actions.move_selection_previous,
["<C-c>"] = actions.close,
["<Down>"] = actions.move_selection_next,
["<Up>"] = actions.move_selection_previous,
["<CR>"] = actions.select_default,
["<C-x>"] = actions.select_horizontal,
["<C-v>"] = actions.select_vertical,
["<C-t>"] = actions.select_tab,
["<C-u>"] = actions.preview_scrolling_up,
["<C-d>"] = actions.preview_scrolling_down,
["<PageUp>"] = actions.results_scrolling_up,
["<PageDown>"] = actions.results_scrolling_down,
["<Tab>"] = actions.toggle_selection + actions.move_selection_worse,
["<S-Tab>"] = actions.toggle_selection + actions.move_selection_better,
["<C-q>"] = actions.send_to_qflist + actions.open_qflist,
["<M-q>"] = actions.send_selected_to_qflist + actions.open_qflist,
["<C-l>"] = actions.complete_tag,
["<C-_>"] = actions.which_key, -- keys from pressing <C-/>
},
n = {
["<esc>"] = actions.close,
["<CR>"] = actions.select_default,
["<C-x>"] = actions.select_horizontal,
["<C-v>"] = actions.select_vertical,
["<C-t>"] = actions.select_tab,
["<Tab>"] = actions.toggle_selection + actions.move_selection_worse,
["<S-Tab>"] = actions.toggle_selection + actions.move_selection_better,
["<C-q>"] = actions.send_to_qflist + actions.open_qflist,
["<M-q>"] = actions.send_selected_to_qflist + actions.open_qflist,
["j"] = actions.move_selection_next,
["k"] = actions.move_selection_previous,
["H"] = actions.move_to_top,
["M"] = actions.move_to_middle,
["L"] = actions.move_to_bottom,
["<Down>"] = actions.move_selection_next,
["<Up>"] = actions.move_selection_previous,
["gg"] = actions.move_to_top,
["G"] = actions.move_to_bottom,
["<C-u>"] = actions.preview_scrolling_up,
["<C-d>"] = actions.preview_scrolling_down,
["<PageUp>"] = actions.results_scrolling_up,
["<PageDown>"] = actions.results_scrolling_down,
["?"] = actions.which_key,
},
},
},
pickers = {
-- Default configuration for builtin pickers goes here:
-- picker_name = {
-- picker_config_key = value,
-- ...
-- }
-- Now the picker_config_key will be applied every time you call this
-- builtin picker
},
extensions = {
-- Your extension configuration goes here:
-- extension_name = {
-- extension_config_key = value,
-- }
-- please take a look at the readme of the extension you want to configure
},
}Credit: Neovim-from-scratch
Save and quit the file using the :wq command. Next, edit the init.lua file to notify Neovim about the newly created file. Open the init.lua file with the following command:
nvim ~/.config/nvim/init.luaAdd the following line at the bottom of the file:
require("telescope")Save and quit the init.lua file.
Conclusion
Telescope is an essential plugin for Neovim that greatly enhances searching capabilities. By following this tutorial, you have learned how to install Telescope, use its basic features, and configure it to better suit your needs.


