Secure Shell (SSH) is a popular way to connect and manage remote Linux servers. If your server is running on a Ubuntu server, enabling SSH service in Ubuntu is relatively easy.
To connect the remote Ubuntu server SSH service needs to be running with the correct port. SSH service may be disabled in your Ubuntu Server for various reasons.
I’ll discuss enabling SSH in Ubuntu in this blog post with a step-by-step guide.
Table of Contents
Checking if SSH is enabled on Ubuntu
By default, SSH service is preinstalled and running in Ubuntu. So, before trying to enable SSH in Ubuntu, check if SSH is enabled on Ubuntu. To check the SSH service status, open the terminal by pressing Ctrl + Alt+ T On your keyboard and enter the following line in the terminal and press enter
systemctl status sshDepending on the status, you may see one of the following output
ssh.service - OpenBSD Secure Shell server: SSH is already installed and enabled on your Ubuntu system.ssh.service is not active: SSH is installed but not currently running.Unit ssh.service could not be found: SSH is not installed on your Ubuntu system.
If SSH is not enabled or installed, you can enable SSH in Ubuntu with the following guide.
Enabling SSH on Ubuntu
If SSH service is not installed in your Ubuntu Server, you must install it before enabling it. To install SSH on Ubuntu, use the following command in the Ubuntu terminal.
sudo apt-get install openssh-serverOnce you have installed SSH server in your Ubuntu machine, you can enable SSH service by entering the following command.
sudo systemctl start sshIf you followed the previous steps correctly, you have enabled SSH on Ubuntu.
Verifying SSH is Running
To ensure SSH is running, you can check the ssh status by entering the following command in the Ubuntu terminal.
systemctl status sshIf SSH is enabled and running, you can see output like this
● ssh.service - OpenBSD Secure Shell server
     Loaded: loaded (/lib/systemd/system/ssh.service; enabled; vendor preset: e>
     Active: active (running) since Thu 2023-04-20 21:05:14 UTC; 4 days ago
       Docs: man:sshd(8)
             man:sshd_config(5)
   Main PID: 1018
      Tasks: 1 (limit: 1077)
     Memory: 5.3M
     CGroup: /system.slice/ssh.service
             └─1018 sshd: /usr/sbin/sshd -D [listener] 0 of 10-100 startups
Setting SSH to Start on Boot
If you reboot your Ubuntu system, SSH service will be disabled on boot. To enable SSH service upon reboot, you can use the following command.
sudo systemctl enable sshThis command adds ssh to the list of services that need to be started upon reboot.
Connecting to Ubuntu via SSH
Now that you have enabled SSH service on your Ubuntu Machine, you can access your Ubuntu machine with SSH protocol. This is useful if you want to manage and execute commands remotely. To connect Ubuntu with SSH you need an SSH client.
There are several SSH clients available for Linux, Mac, and Windows.
Using the Terminal on macOS and Linux
OpenSSH comes preinstalled with Linux and macOS. To connect to your Ubuntu server, you need to know the public IP address of your Ubuntu. With ssh command, you can easily connect to your remote Ubuntu. Use the following command to connect with Ubuntu
This is the basic ssh command to connect with Remote servers. After running this command, you will ask to enter a password to establish the connection.
You can use the following command if you have a public/private key to authenticate the connection instead of a password.
ssh -i private_key_location [email protected]You can read our article if you want to optimize your connection and make it faster.
Using PuTTY on Windows
Windows doesn’t come with any SSH client preinstalled. You need to download an SSH client to connect your remote Ubuntu Server. PuTTY is the most popular SSH client for Windows. You can also use OpenSSH in Windows PowerShell.
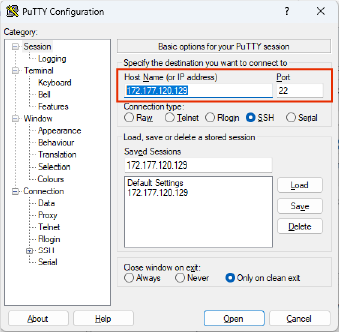
To connect to your Ubuntu using PuTTY, open Putty and enter the Public IP address of your Ubuntu Server in the Host Name field.

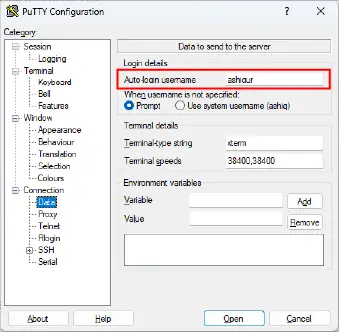
Under Connection click Data and enter your user name in auto-login username field.

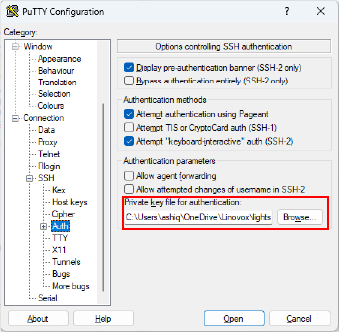
If you have a private key file instead of a password, click SSH, then Auth, and browse and select a private key file for authentication purposes.

Then back to session and click open to initialize the connection.
Conclusion
Secure Shell (SSH) provides an easy and convenient way to connect to the remote server. Enabling SSH in Ubuntu is a prerequisite for connecting to the Ubuntu server. Enabling SSH in Ubuntu is a straightforward process. By following this step-by-step guide, you can easily enable SSH in Ubuntu.


