Managing users in Debian is a fundamental task for maintaining server security, organizing access control, and facilitating smooth operation within a multi-user environment. Debian, like all Linux distributions, supports a multi-user system where administrative tasks can be managed by superusers (root), and regular users have specific permissions to ensure system integrity.
In this guide, you will learn how to add users, set passwords, and delete users in Debian 12. This tutorial covers several command-line tools such as adduser, useradd, and newusers.
Prerequisites
Before adding a new user in Debian, ensure you meet the following requirements:
- You have superuser or root permissions.
- You have administrative privileges.
- Text editors like Nano or Vim are installed.
How to Add a User in Debian
Debian provides multiple tools for adding users, including adduser, useradd, and newusers. Each tool offers different options to suit various needs.
Step 1: Switch to the Root User
Before proceeding with adding a user to the Debian system, it is recommended to switch to the root user. To do this, simply enter the following command in your terminal:
su -lStep 2: Adding a User with the adduser Command
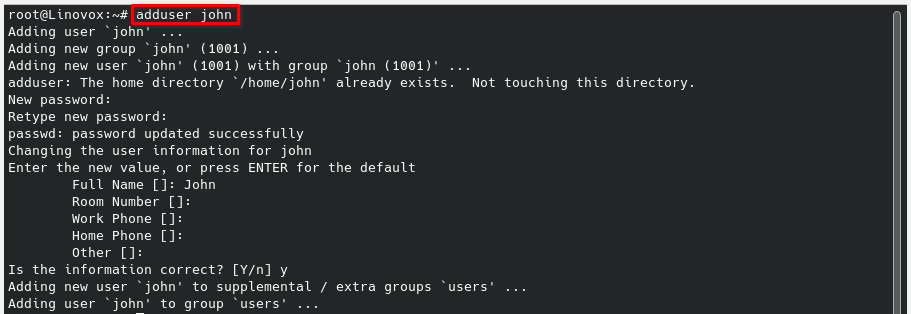
The adduser command is the recommended method for adding users in Debian. It offers a straightforward process for specifying a username, setting a password, and providing additional details about the user. Follow these steps to add a user:
adduser usernameThis command creates a new user account named ‘username’. You will be prompted to set a password and provide additional information.

Confirm the details by entering Y.
By following these steps, the new user’s home directory is created, and necessary files are copied from /etc/skel.
Step 3: Granting Sudo Access to New Users
By default, when you add a new user, they do not have sudo access. To grant sudo access to a new user, you need to manually configure it. Follow the tutorial How to Add a New User to sudoers in Debian 12 for step-by-step instructions on granting sudo privileges.
Adding a User with the useradd Command
Another tool for adding a user is the useradd command. Similar to adduser, useradd also provides an easy and efficient way to add users in Debian. To add a user using useradd, use the following command:
useradd usernameThis command will add a user to the Debian system without specifying any additional properties. However, you can customize this command to include other properties.
Setting Passwords for the New Users
By default, when adding a user with the useradd command, no password is assigned for login. Therefore, it is necessary to set a password in order to enable interactive login. You can set a password for a new user by executing the following command:
sudo passwd usernameRemember to choose a strong password that includes both uppercase and lowercase letters to enhance system security.
Adding Multiple Users with the newusers Command
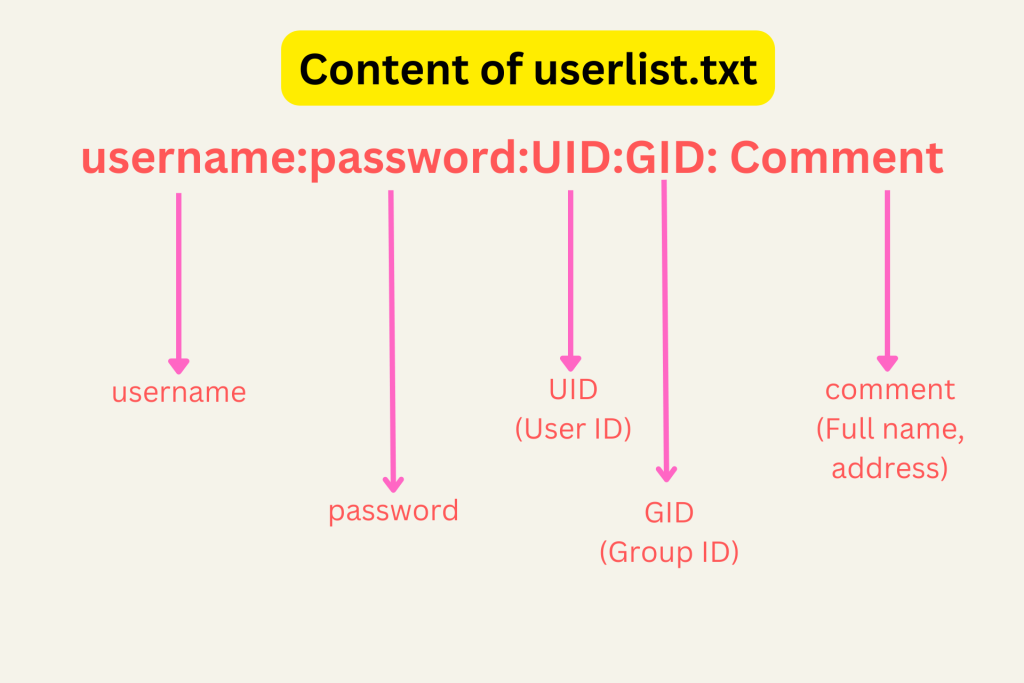
The newusers command is helpful for adding multiple users at once. With the newusers command, you provide a list of users to be created in a text file. The content of the text file should have the following information:

You can add multiple users’ information separated by new lines. When your text file is ready, you can use the file to add multiple users to your Debian system with the following command:
newusers < userlist.txtSuggested Read:
How to Delete a User in Debian
If a user account is no longer needed, you can delete a user in Debian with the userdel command. To delete a user in Debian, open the terminal and enter the following command:
userdel usernameBy default, Debian will only delete the user entry, excluding the home directory, mailbox, etc. To completely delete a user in Debian, you need to use the -r flag:
userdel -r usernameConclusion
In this blog post, we have covered different CLI tools for adding users to the Debian system, including adduser, useradd, and newusers. We also discussed how to set passwords for new users and manage multiple user accounts simultaneously. Finally, we provided instructions on how to completely delete a user in Debian.
Feel free to leave a comment if you have any questions or need further assistance.


