Language Server Protocol (LSP) is an open standard created by Microsoft that allows different code editors and IDEs to communicate with language servers. These language servers are specific to programming languages and provide advanced language-aware features such as autocompletion, code navigation, and code diagnostics. With LSP installed directly in your neovim, you can enjoy these awesome features.
In this blog, we will explore how to install the Language Server Protocol (LSP) in neovim and configure neovim for autocompletion.
Table of Contents
Prerequisites
Before proceeding with the installation and usage of nvim-cmp in Neovim, please make sure you have the following packages installed on your system:
Packer
Packer is a plugin manager for Neovim. You need Packer to install the nvim-cmp plugin. If you haven’t installed Packer yet, consider installing Packer and then follow the rest of the tutorial.
Node.js
Node.js is required to download and install different LSP servers in neovim. You can install Node.js with the following commands:
For macOS:
brew install nodeFor Debian/Ubuntu:
sudo apt install npmFor Fedora/RHEL:
sudo dnf install npmFor Arch Linux:
sudo pacman -S npmInstalling LSP Server
Before installing LSP servers in Neovim, let’s take a look at the project structure. Please note that you can still follow this guide even if you have a different project structure. Just be careful when editing the configuration files.
~/.config/
└── nvim
    ├── init.lua
    └── lua
        ├── lsp
        │   ├── mason.lua
        │   ├── handlers.lua
        │   └── settings.lua
        ├── plugins.lua
        ├── .....
        └── other configuration files
To install the necessary plugins for configuring LSP servers, open the plugins.lua file using the following command:
nvim ~/.config/nvim/lua/plugins.luaIf your plugins file has a different name or is located in a different directory, open the file accordingly. After opening the plugins file, add the following lines to install the plugins:
-- Managing & installing LSP servers, linters & formatters
use("williamboman/mason.nvim") -- In charge of managing LSP servers, linters & formatters
use("williamboman/mason-lspconfig.nvim") -- Bridges the gap between mason & lspconfig

-- Configuring LSP servers
use("neovim/nvim-lspconfig") -- Easily configure language servers
use("hrsh7th/cmp-nvim-lsp") -- For autocompletion
use({
  "glepnir/lspsaga.nvim",
  branch = "main",
  requires = {
    { "nvim-tree/nvim-web-devicons" },
    { "nvim-treesitter/nvim-treesitter" },
  },
}) -- Enhanced LSP UIs
use("jose-elias-alvarez/typescript.nvim") -- Additional functionality for TypeScript server (e.g., rename file & update imports)
use("onsails/lspkind.nvim") -- VSCode-like icons for autocompletion
Once you’ve added these lines to the plugins.lua file, save it using the :w command to install the plugins. Alternatively, you can use the following command to install the plugins:
:PackerInstallSetting Up LSP
According to our project structure, we will keep all LSP Lua configuration files under the lsp directory. To create the lsp directory under the lua folder, run the following command in your terminal:
mkdir -p ~/.config/nvim/lua/lspThen we need three Lua configuration files for configuring the LSP server. The first and most important configuration is for Mason to install the LSP servers to Neovim. In the previous section, we installed the Mason Neovim plugin, and now it’s time to install your preferred LSP server.
Installed LSP servers
To start configuring the LSP server, run the following command to create/edit the mason.lua configuration file:
nvim ~/.config/nvim/lua/lsp/mason.luaThen add the following lines to the file:
local servers = {
  "lua_ls",
  "cssls",
  "html",
  "tsserver",
  "pyright",
  "bashls",
  "jsonls",
  "yamlls",
}

local settings = {
  ui = {
    border = "none",
    icons = {
      package_installed = "◍",
      package_pending = "◍",
      package_uninstalled = "◍",
    },
  },
  log_level = vim.log.levels.INFO,
  max_concurrent_installers = 4,
}

require("mason").setup(settings)
require("mason-lspconfig").setup({
  ensure_installed = servers,
  automatic_installation = true,
})

local lspconfig_status_ok, lspconfig = pcall(require, "lspconfig")
if not lspconfig_status_ok then
  return
end

local opts = {}

for _, server in pairs(servers) do
  opts = {
    on_attach = require("lsp.handlers").on_attach,
    capabilities = require("lsp.handlers").capabilities,
  }

  server = vim.split(server, "@")[1]

  local require_ok, conf_opts = pcall(require, "lsp.settings." .. server)
  if require_ok then
    opts = vim.tbl_deep_extend("force", conf_opts, opts)
  end

  lspconfig[server].setup(opts)
end
In this configuration file, we have added the following servers:
- bashls (A language server for Bash)
- cssls (Language Server Protocol implementation for CSS, SCSS & LESS)
- html (Language Server Protocol implementation for HTML)
- jsonls (Language Server Protocol implementation for JSON)
- lua_ls (A language server that offers Lua language support – programmed in Lua)
- pyright (Static type checker for Python)
- tsserver (TypeScript & JavaScript Language Server)
With Mason, you can install a wide range of supported LSP servers. To view all the available LSP servers, check the list of available lsp server.
As always, to load the configuration file each time Neovim starts, you need to add the configuration file to the init.lua file. Open the init.lua file:
nvim ~/.config/nvim/init.luaThen add the following line to activate Mason:
require "lsp.mason"Save the file and restart Neovim; then you will see the LSP servers automatically installed and activated when they detect specific file types.
Using Mason to Manage LSP Servers
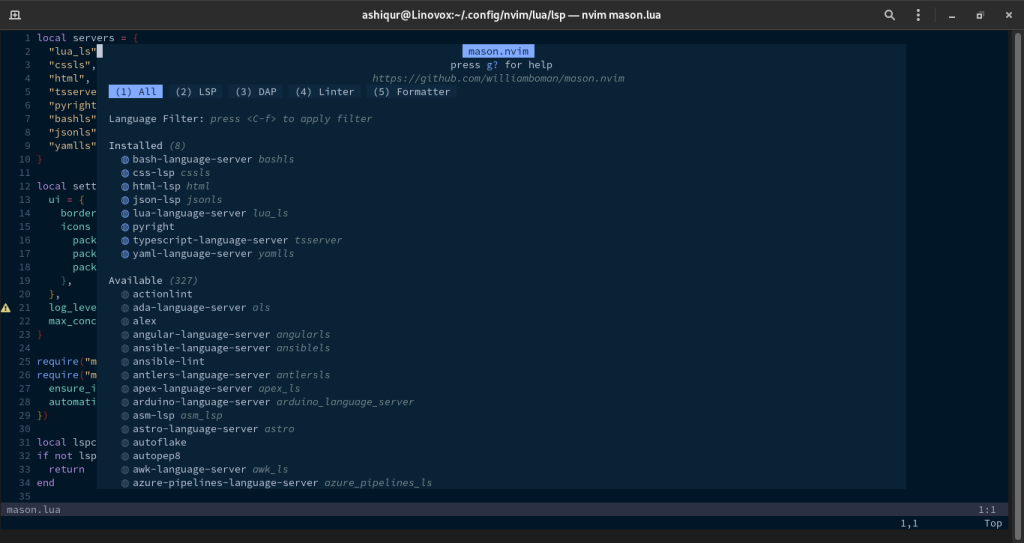
Mason provides several commands to manage your LSP servers. To see the installed servers and all available servers that can be installed with Mason, enter the following command in Neovim:
:Mason
From this graphical status window, you can see which servers are installed in Neovim as well as available servers that can be used in Neovim.
You can also install any LSP server with the :MasonInstall command. For example, if you want to install the LSP server for Python, you can install pyright (Python LSP implementation for Neovim) with the following command:
:MasonInstall pyrightYou can also uninstall LSP server packages by defining the LSP server name in the mason.lua configuration file.
If you don’t need an LSP server anymore, you can uninstall the package with the :MasonUninstall command. For example, if you don’t need the Python LSP server anymore, you can remove it with the following command:
:MasonUninstall pyrightMason also supports uninstalling all the packages with a single command. To remove all the installed LSP servers, you can use the following command:
:MasonUninstallAllIf you occasionally encounter any errors in Mason or the LSP server, you can see the details about the error in the Mason log. To access the details log, use the following command:
:MasonLogConfiguring Language Server Protocol (LSP)
Now that you have installed your preferred Language Server Protocol (LSP) servers with Mason, it’s time to configure the LSP servers to get the most out of the Language Server Protocol. For example, you may want the LSP server to activate automatically based on the file extension when you open a file. For instance, if you open an HTML file, the HTML language server protocol should be automatically installed. To configure the LSP server, open your terminal and create/open the handlers.lua file:
nvim ~/.config/nvim/lua/lsp/handlers.luaThen add the following configuration to the file:
local M = {}
local status_cmp_ok, cmp_nvim_lsp = pcall(require, "cmp_nvim_lsp")
if not status_cmp_ok then
return
end
M.capabilities = vim.lsp.protocol.make_client_capabilities()
M.capabilities.textDocument.completion.completionItem.snippetSupport = true
M.capabilities = cmp_nvim_lsp.default_capabilities(M.capabilities)
M.setup = function()
local signs = {
{ name = "DiagnosticSignError", text = "" },
{ name = "DiagnosticSignWarn", text = "" },
{ name = "DiagnosticSignHint", text = "" },
{ name = "DiagnosticSignInfo", text = "" },
}
for _, sign in ipairs(signs) do
vim.fn.sign_define(sign.name, { texthl = sign.name, text = sign.text, numhl = "" })
end
local config = {
virtual_text = false, -- disable virtual text
signs = {
active = signs, -- show signs
},
update_in_insert = true,
underline = true,
severity_sort = true,
float = {
focusable = true,
style = "minimal",
border = "rounded",
source = "always",
header = "",
prefix = "",
},
}
vim.diagnostic.config(config)
vim.lsp.handlers["textDocument/hover"] = vim.lsp.with(vim.lsp.handlers.hover, {
border = "rounded",
})
vim.lsp.handlers["textDocument/signatureHelp"] = vim.lsp.with(vim.lsp.handlers.signature_help, {
border = "rounded",
})
end
local function lsp_keymaps(bufnr)
local opts = { noremap = true, silent = true }
local keymap = vim.api.nvim_buf_set_keymap
keymap(bufnr, "n", "gD", "<cmd>lua vim.lsp.buf.declaration()<CR>", opts)
keymap(bufnr, "n", "gd", "<cmd>lua vim.lsp.buf.definition()<CR>", opts)
keymap(bufnr, "n", "K", "<cmd>lua vim.lsp.buf.hover()<CR>", opts)
keymap(bufnr, "n", "gI", "<cmd>lua vim.lsp.buf.implementation()<CR>", opts)
keymap(bufnr, "n", "gr", "<cmd>lua vim.lsp.buf.references()<CR>", opts)
keymap(bufnr, "n", "gl", "<cmd>lua vim.diagnostic.open_float()<CR>", opts)
keymap(bufnr, "n", "<leader>lf", "<cmd>lua vim.lsp.buf.format{ async = true }<cr>", opts)
keymap(bufnr, "n", "<leader>li", "<cmd>LspInfo<cr>", opts)
keymap(bufnr, "n", "<leader>lI", "<cmd>LspInstallInfo<cr>", opts)
keymap(bufnr, "n", "<leader>la", "<cmd>lua vim.lsp.buf.code_action()<cr>", opts)
keymap(bufnr, "n", "<leader>lj", "<cmd>lua vim.diagnostic.goto_next({buffer=0})<cr>", opts)
keymap(bufnr, "n", "<leader>lk", "<cmd>lua vim.diagnostic.goto_prev({buffer=0})<cr>", opts)
keymap(bufnr, "n", "<leader>lr", "<cmd>lua vim.lsp.buf.rename()<cr>", opts)
keymap(bufnr, "n", "<leader>ls", "<cmd>lua vim.lsp.buf.signature_help()<CR>", opts)
keymap(bufnr, "n", "<leader>lq", "<cmd>lua vim.diagnostic.setloclist()<CR>", opts)
end
M.on_attach = function(client, bufnr)
if client.name == "tsserver" then
client.server_capabilities.documentFormattingProvider = false
end
if client.name == "sumneko_lua" then
client.server_capabilities.documentFormattingProvider = false
end
lsp_keymaps(bufnr)
local status_ok, illuminate = pcall(require, "illuminate")
if not status_ok then
return
end
illuminate.on_attach(client)
end
return MIn this configuration file, necessary keyword mappings are provided, as well as useful icons for code diagnostics.
You need to add another configuration file called null-ls.lua configuration file. Use the following command to create/open the file:
nvim ~/.config/nvim/lua/lsp/null-ls.luaAnd add the following line to the configuration file:
local null_ls_status_ok, null_ls = pcall(require, "null-ls")
if not null_ls_status_ok then
  return
end

-- <https://github.com/jose-elias-alvarez/null-ls.nvim/tree/main/lua/null-ls/builtins/formatting>
local formatting = null_ls.builtins.formatting
-- <https://github.com/jose-elias-alvarez/null-ls.nvim/tree/main/lua/null-ls/builtins/diagnostics>
local diagnostics = null_ls.builtins.diagnostics

null_ls.setup({
  debug = false,
  sources = {
    formatting.prettier.with({ extra_args = { "--no-semi", "--single-quote", "--jsx-single-quote" } }),
    formatting.black.with({ extra_args = { "--fast" } }),
    formatting.stylua,
    -- diagnostics.flake8
  },
})
After adding the configuration, you need to define them in the init.lua file so that they are executed when Neovim starts. To add these lines, open the init.lua file:
nvim ~/.config/nvim/init.luaand add the following at the end of the file:
require("lsp.handlers").setup()
require("lsp.null-ls")
Save the file and restart Neovim so that the changes could take effect.
Configure Autocomplete for LSP
In our other tutorial, we have discussed basic auto-completion with the cmp plugin. If you haven’t installed cmp for autocompletion, consider setting up basic cmp autocompletion before configuring autocompletion for LSP.
If you have already configured cmp for autocompletion, proceed to the following steps. Open the nvim-cmp.lua file:
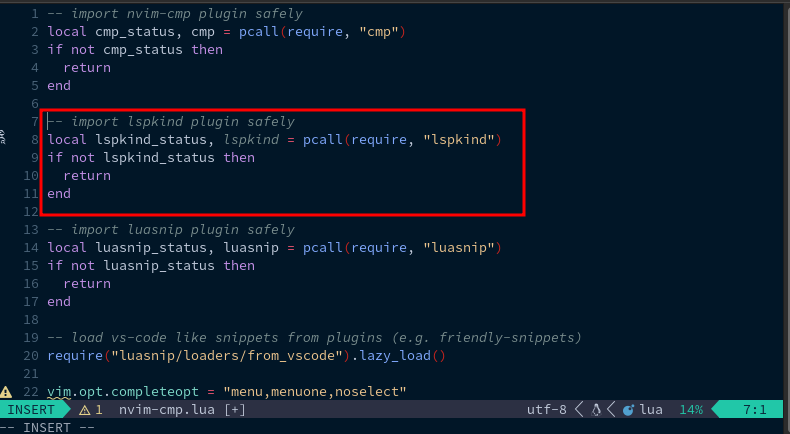
nvim ~/.config/nvim/lua/nvim-cmp.luaand add the following line to the configuration file below the line calling nvim-cmp:
-- Import lspkind plugin safely
local lspkind_status, lspkind = pcall(require, "lspkind")
if not lspkind_status then
  return
end
Your configuration file should look like this:

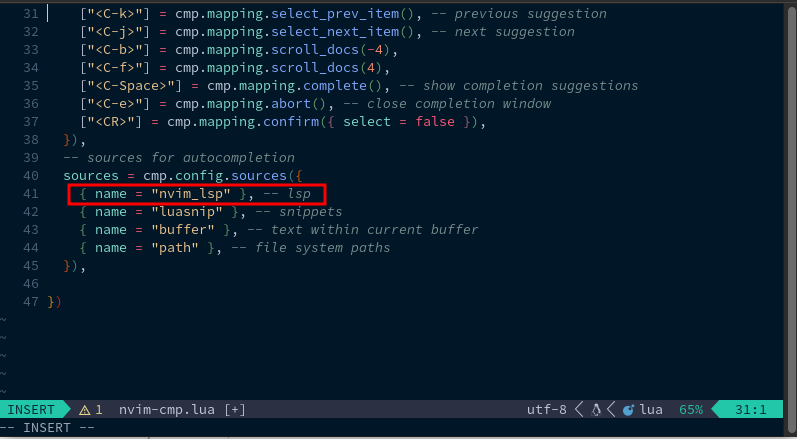
Then, add LSP as a source at the bottom:
{ name = "nvim_lsp" }, -- LSP

Save the file and restart Neovim.
Conclusion
In this blog post, we’ve explored the Language Server Protocol (LSP) and its integration with Neovim and how to to unlock a wealth of powerful features for developers. By setting up LSP in Neovim, we’ve learned how to configure LSP servers for different programming languages, enabling intelligent code autocompletion, diagnostics, and error highlighting. We’ve also seen how to manage LSP servers with Mason and how to configure autocomplete for LSP with the cmp plugin.


