If you’re passionate about coding or writing in Neovim, you know that a well-crafted environment can greatly enhance your productivity and enjoyment. One crucial aspect of this is the visual appeal of your text editor, and that’s where colorschemes come into play. But it’s not just about aesthetics; colorschemes can significantly affect your workflow, making your code more readable and your writing more engaging.
In this comprehensive guide, We’ll guide you through the installation of the renowned Gruvbox colorscheme, known for its soothing and aesthetically pleasing design. we’ll also dive into the world of Neovim colorschemes and plugin management. We’ll show you how to unlock the full spectrum of colors in your terminal, enabling Neovim to display rich, vibrant hues that go beyond the standard color palette.
Enabling True Color Terminal
Before installing a colorscheme in Neovim, it is recommended to enable true color terminal support. This enables Neovim to utilize 24-bit RGB color values, providing a broader and more accurate range of colors in your terminal. Enabling true colors allows colorschemes to display richer and more vibrant colors, enhancing your overall Neovim experience.
To enable true color terminal support, follow these steps:
Open your init.lua file with the following command:
nvim ~/.config/nvim/init.vimPaste the following lines at the bottom of your configuration:
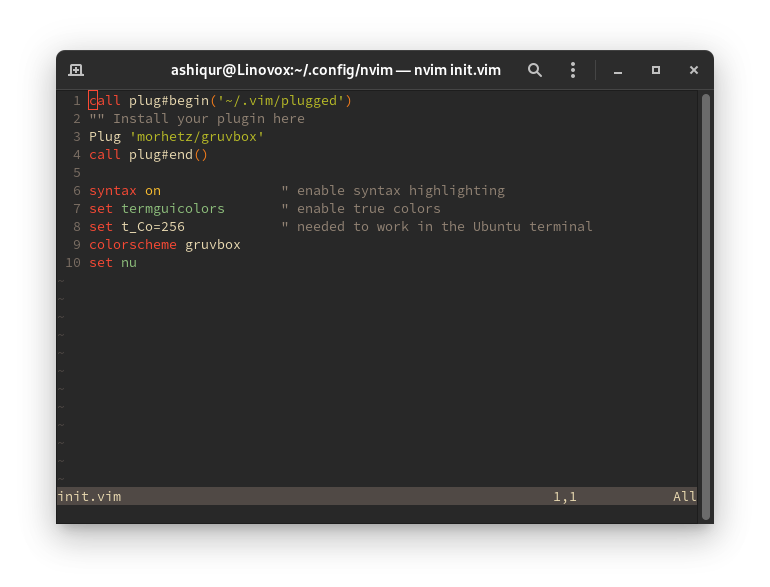
syntax on               " Enable syntax highlighting
set termguicolors       " Enable true colors
set t_Co=256            " Required for the Ubuntu terminal
Please note that configurations in your init.vim file are executed sequentially. If you insert configurations at the top that depend on others below them, your Neovim configuration may not work correctly.
Installing a Plugin Manager for Neovim
In Neovim, adding custom third-party tools or colorschemes typically involves installing them as Neovim plugins. To facilitate this, you need a plugin manager. There are several plugin managers available for Neovim, such as Packer, Lazyvim, and vim-plug. Packer and Lazyvim are feature-rich but require more complex configuration, while vim-plug is a minimalist option suitable for straightforward plugin installation.
Installing vim-plug for Neovim
macOS and Linux
To install vim-plug on macOS and Linux, open your terminal and execute the following command:
sh -c 'curl -fLo "${XDG_DATA_HOME:-$HOME/.local/share}"/nvim/site/autoload/plug.vim --create-dirs \\\\
       <https://raw.githubusercontent.com/junegunn/vim-plug/master/plug.vim>'
After installing vim-plug, restart NeoVim to apply the changes.
Windows
For Windows users, to install vim-plug for use in Vim in PowerShell, open PowerShell and execute the following command:
iwr -useb <https://raw.githubusercontent.com/junegunn/vim-plug/master/plug.vim> |`
    ni "$(@($env:XDG_DATA_HOME, $env:LOCALAPPDATA)[$null -eq $env:XDG_DATA_HOME])/nvim-data/site/autoload/plug.vim" -Force
After installing vim-plug, restart Vim to apply the changes.
If you prefer to use Packer as your plugin manager, you can follow our guided tutorial for its installation before proceeding with custom colorscheme installation.
???? If you haven’t set up Packer in Neovim, consider installing Packer in Neovim before proceeding with installing any custom colorschemes.
Installing the Gruvbox Colorscheme
Now that you have a plugin manager in place, it’s time to install the Gruvbox colorscheme. To do this, follow these steps:
Add the following lines at the top of your init.vim configuration file:
call plug#begin('~/.vim/plugged')
" Install your plugin here
Plug 'morhetz/gruvbox'
call plug#end()
Save and quit the Neovim editor using the :wq command.
Reopen your init.vim file:
nvim ~/.config/nvim/init.vimTo install the Gruvbox colorscheme as a plugin, use the :PlugInstall command. You can monitor the installation progress in your split terminal.
Setting the Gruvbox Colorscheme
With the Gruvbox colorscheme installed, you can now set it as your default colorscheme. To do this, follow these steps:
Open your init.vim configuration file:
nvim ~/.config/nvim/init.vimPaste the following line at the bottom of your configuration file:
colorscheme gruvboxSave and exit the file to apply the changes.
Restart Neovim, and you’ll see that the Gruvbox theme is successfully applied.

Installing the Gruvbox Theme with Packer
This tutorial is tailored for minimalist users who want to install a few plugins and set up an attractive colorscheme. For more advanced users interested in customizing their entire Neovim setup, applying syntax highlighting, using fuzzy finding tools, and Language Server Protocol integration, a Lua-based plugin manager like Packer offers greater flexibility for installing and configuring Neovim. If you’re interested in using Packer, don’t worry; we’ve published an entire Neovim series that covers installing various colorschemes for Neovim.
If you’d like to explore more themes, check out our post on the Top 10 Best Neovim Themes.
Conclusion
As we wrap up this journey through the vibrant world of Neovim colorschemes and plugin management, you’ve acquired the tools and knowledge to craft your ideal coding or writing environment. Your Neovim editor is no longer just a text editor; it’s your canvas, ready to be painted with the colors that inspire you.


