Nvim Tree is a terminal file explorer for Neovim. It provides a very useful interface for navigating between files and directories. Nvim Tree is a capable file manager that allows easy file creation, deletion, and renaming directly from the terminal. It can be installed as a plugin for Neovim, which is a popular fork of the terminal editor Vim.
In this blog post, I’ll show you how to install and use Nvim Tree. I’ll also demonstrate how to set custom keybindings for Nvim Tree and enable web development icons for Neovim.
Table of Contents
Prerequisites
Before proceeding with the installation and usage of Nvim Tree in Neovim, ensure that you have the following packages installed on your system:
Neovim (>=0.8.0)
To use Nvim Tree, your system should have Neovim version 0.8.0 or higher. You can check your currently installed version of Neovim by running the following command:
nvim --versionIf you have a version below 0.8.0, consider upgrading your system using the following command:
sudo apt update && sudo apt upgradeIf the repository of your distribution doesn’t contain the latest version of Neovim (e.g., Debian 12), you can use the snap package to install the latest version:
sudo snap install nvim --classicPacker
Packer is a plugin manager for Neovim, and since Nvim Tree is a Neovim plugin, you need to have Packer installed. If you haven’t installed Packer in Neovim yet, you can refer to the guide on installing Packer in Neovim before installing Nvim Tree.
Nerd Font
Nerd Font is used to display icons in the terminal file explorer. Although optional, it is highly recommended. This font makes it easier to navigate within your files and directories. There are many nerd fonts available, and you can choose any of them.
If you don’t have any nerd font installed, you can follow these steps to install one. Open the terminal and enter the following command to download Anonymous Pro Nerd Font:
curl -L https://github.com/ryanoasis/nerd-fonts/releases/download/v3.0.2/AnonymousPro.zip > AnonymousPro.zipAfter downloading the Anonymous Pro Nerd Font, use the following command to install the fonts on your system:
sudo unzip AnonymousPro.zip -d /usr/share/fonts/AnonymousProFinally, reboot your system to apply the font changes.
Installing Nvim Tree
Once you have installed Packer in Neovim, you can easily install the Nvim Tree plugin. To begin, open the plugins.lua file in your Neovim configuration. If you have followed our guide on installing Packer, your file structure should look like this:
~/.config/
└── nvim
    ├── init.lua
    └── lua
        ├── plugins.lua
        ├── .....
        ├── .....
        └── other configuration files
Now, to install the Nvim Tree plugin, open the plugins.lua file with the following command:
nvim ~/.config/nvim/lua/plugins.luaIf your plugins file has a different name or is located in a different directory, open the file accordingly. After opening the plugins file, add the following two lines to install Nvim Tree:
-- file explorer
use("nvim-tree/nvim-tree.lua")

-- vs-code like icons
use("nvim-tree/nvim-web-devicons")
nvim-tree.lua: The Nvim Tree plugin itselfnvim-web-devicons: (optional) This plugin enables icons to easily distinguish between different file types and file statuses.

After adding these lines to the plugins.lua file, save it using the :w command to install the plugins.
Once the plugins are installed, open the init.lua file with the following command:
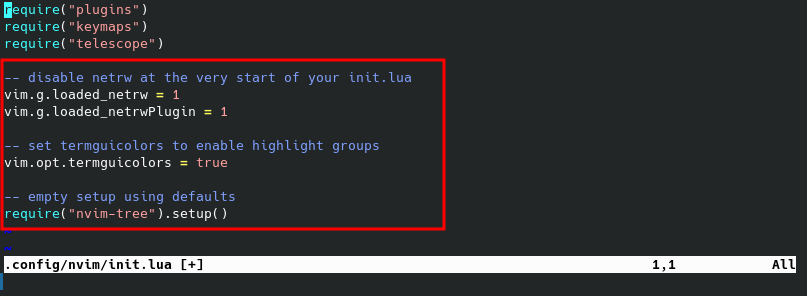
nvim ~/.config/nvim/init.luaThen, add the following lines at the bottom of your init.lua file:
-- disable netrw at the very start of your init.lua
vim.g.loaded_netrw = 1
vim.g.loaded_netrwPlugin = 1

-- set termguicolors to enable highlight groups
vim.opt.termguicolors = true

-- empty setup using defaults
require("nvim-tree").setup()
Save and exit the Neovim editor to finish installing the Nvim Tree plugins for Neovim.
Using Nvim Tree
Nvim Tree is a powerful and versatile file explorer for Neovim that allows you to navigate and manage your project files and directories effectively. It provides an easy-to-use interface for finding and opening files.
Opening Nvim Tree
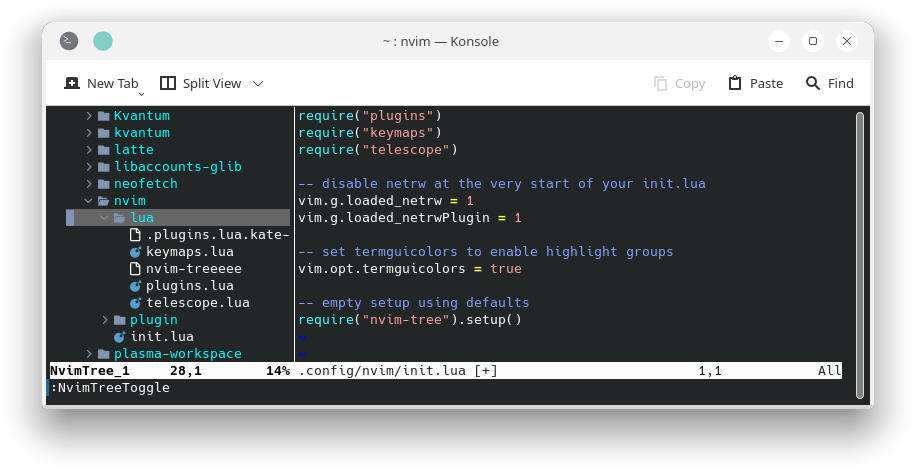
To open Nvim Tree, use the :NvimTreeToggle command, and a terminal file manager will appear in the left section of your terminal:
:NvimTreeToggle
You can also use the :NvimTreeToggle command to close the Nvim Tree file explorer.
Custom Keybindings
Typing the :NvimTreeToggle command every time you want to open and close Nvim Tree might feel like a lot of work. To easily toggle Nvim Tree on and off, you can set up custom keybindings. You can achieve this by using Which Key, a Neovim plugin. If you haven’t configured Which Key yet, you can follow our guide to set up Which Key in Neovim.
To get started, open the whichkey.lua file by executing the following command:
nvim ~/.config/nvim/lua/whichkey.luaThen, add the following lines to the file:
-- Nvim Tree
["e"] = { "<cmd>NvimTreeToggle<cr>", "Explorer" },
Save and quit the file using the :wq command.
Now, you can use <leader>e to toggle Nvim Tree on and off.
Navigation
Nvim Tree provides several navigation options to help you browse through your project’s files and directories. Here are some default keybindings you can use:
| Keybinding | Action |
|---|---|
| j | Move the cursor down to the next entry |
| k | Move the cursor up to the previous entry |
| o | Open the selected file or directory |
Working with Files and Directories
Nvim Tree allows you to perform various file and directory operations directly from the file explorer. You can create, delete, rename files easily with N
vim Tree. Here are some default useful keybindings:
| Keybinding | Action |
|---|---|
| m | Open the Nvim Tree context menu to perform actions on the selected entry |
| d | Delete the selected file or directory (moves it to the trash) |
| y | Copy the path of the selected file or directory to the clipboard |
| r | Rename the selected file or directory |
| a | Create a new file or directory in the current directory |
Filtering and Searching
Nvim Tree provides features to filter and search for files and directories within your project. These options can help you quickly locate specific files or narrow down your view. Here are some default keybindings you can use:
| Keybinding | Action |
|---|---|
| /{search term} | Start a search to filter files and directories |
| n | Move to the next search result |
| N | Move to the previous search result |
Conclusion
Nvim Tree is a powerful terminal file explorer that allows you to effortlessly navigate and manage your files and folders in your project directory. Nvim Tree has several dependencies that need to be acknowledged before installing it in Neovim. By following this guide, even if you’re a beginner, you can easily install and configure Nvim Tree.


